Showing posts with label Oracle Advanced Analytics. Show all posts

Wednesday, April 24, 2019

Time Series Forecasting in Oracle – Part 2

This is the second part about time-series data modeling using Oracle. Check out the first part here.

In this post I will take a time-series data set and using the in-database time-series functions model the data, that in turn can be used for predicting future values and trends.

The data set used in these examples is the Rossmann Store Sales data set. It is available on Kaggle and was used in one of their competitions.

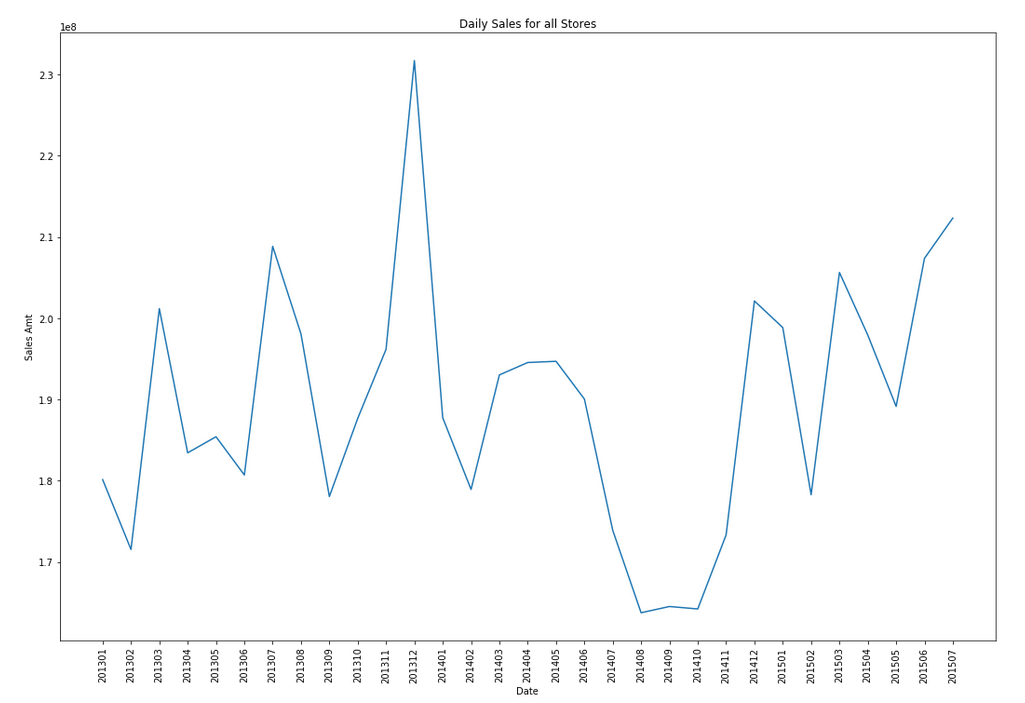
Let's start by aggregating the data to monthly level. We get.
Screenshot 2019-04-16 12.37.59  

Data Set-up
Although not strictly necessary, but it can be useful to create a subset of your time-series data to only contain the time related attribute and the attribute containing the data to model. When working with time-series data, the exponential smoothing function expects the time attribute to be of DATE data type. In most cases it does. When it is a DATE, the function will know how to process this and all you need to do is to tell the function the interval. A view is created to contain the monthly aggregated data.

-- Create input time series
create or replace view demo_ts_data as 
select to_date(to_char(sales_date, 'MON-RRRR'),'MON-RRRR') sales_date,
sum(sales_amt) sales_amt
from demo_time_series
group by to_char(sales_date, 'MON-RRRR')
order by 1 asc;

Next a table is needed to contain the various settings for the exponential smoothing function.

CREATE TABLE demo_ts_settings(setting_name VARCHAR2(30), 
                              setting_value VARCHAR2(128));

Some care is needed with selecting the parameters and their settings as not all combinations can be used.

Example 1 - Holt-Winters
The first example is to create a Holt-Winters time-series model for hour data set. For this we need to set the parameter to include defining the algorithm name, the specific time-series model to use (exsm_holt), the type/size of interval (monthly) and the number of predictions to make into the future, pass the last data point.

BEGIN
   -- delete previous setttings
   delete from demo_ts_settings;

   -- set ESM as the algorithm
   insert into demo_ts_settings 
      values (dbms_data_mining.algo_name,
              dbms_data_mining.algo_exponential_smoothing);

   -- set ESM model to be Holt-Winters
   insert into demo_ts_settings 
      values (dbms_data_mining.exsm_model,
              dbms_data_mining.exsm_holt);

   -- set interval to be month
   insert into demo_ts_settings 
      values (dbms_data_mining.exsm_interval,
              dbms_data_mining.exsm_interval_month);

   -- set prediction to 4 steps ahead
   insert into demo_ts_settings 
      values (dbms_data_mining.exsm_prediction_step,
              '4');

   commit; 
END;

Now we can call the function, generate the model and produce the predicted values.

BEGIN
   -- delete the previous model with the same name
   BEGIN 
      dbms_data_mining.drop_model('DEMO_TS_MODEL');
   EXCEPTION 
      WHEN others THEN null; 
   END;

   dbms_data_mining.create_model(model_name => 'DEMO_TS_MODEL',
                                 mining_function => 'TIME_SERIES',
                                 data_table_name => 'DEMO_TS_DATA',
                                 case_id_column_name => 'SALES_DATE',
                                 target_column_name => 'SALES_AMT',
                                 settings_table_name => 'DEMO_TS_SETTINGS');
END;

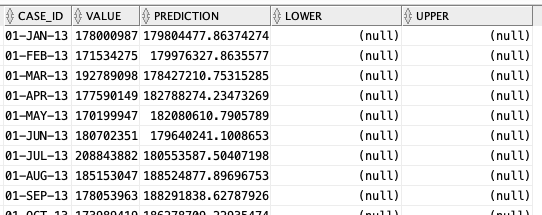
When the model is create a number of data dictionary views are populated with model details and some addition views are created specific to the model. One such view commences with DM$VP. Views commencing with this contain the predicted values for our time-series model. You need to append the name of the model create, in our example DEMO_TS_MODEL.
 
-- get predictions
select case_id, value, prediction, lower, upper 
from   DM$VPDEMO_TS_MODEL
order by case_id;


Screenshot 2019-04-16 16.01.14

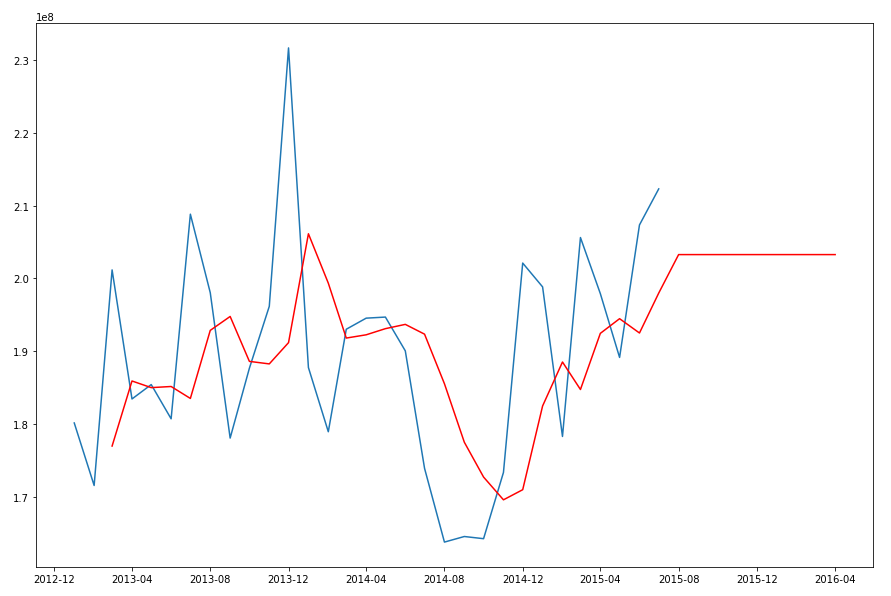
When we plot this data we get. Screenshot 2019-04-16 16.02.57 The blue line contains the original data values and the red line contains the predicted values. The predictions are very similar to those produced using Holt-Winters in Python. Screenshot 2019-04-16 16.04.45  

Example 2 - Holt-Winters including Seasonality
The previous example didn't really include seasonality int the model and predictions. In this example we introduce seasonality to allow the model to pick up any trends in the data based on a defined period. For this example we will change the model name to HW_ADDSEA, and the season size to 5 units. A data set with a longer time period would illustrate the different seasons better but this gives you an idea.

BEGIN
   -- delete previous setttings
   delete from demo_ts_settings;

   -- select ESM as the algorithm
   insert into demo_ts_settings 
   values (dbms_data_mining.algo_name,
           dbms_data_mining.algo_exponential_smoothing);

   -- set ESM model to be Holt-Winters Seasonal Adjusted
   insert into demo_ts_settings 
   values (dbms_data_mining.exsm_model,
           dbms_data_mining.exsm_HW_ADDSEA);

   -- set interval to be month
   insert into demo_ts_settings 
   values (dbms_data_mining.exsm_interval,
   dbms_data_mining.exsm_interval_month);

  -- set prediction to 4 steps ahead
  insert into demo_ts_settings 
  values (dbms_data_mining.exsm_prediction_step,
          '4');

   -- set seasonal cycle to be 5 quarters
   insert into demo_ts_settings 
   values (dbms_data_mining.exsm_seasonality,
           '5');

commit; 
END;

We need to re-run the creation of the model and produce the predicted values. This code is unchanged from the previous example.

BEGIN
   -- delete the previous model with the same name
   BEGIN 
      dbms_data_mining.drop_model('DEMO_TS_MODEL');
   EXCEPTION 
      WHEN others THEN null; 
   END;

   dbms_data_mining.create_model(model_name => 'DEMO_TS_MODEL',
                                 mining_function => 'TIME_SERIES',
                                 data_table_name => 'DEMO_TS_DATA',
                                 case_id_column_name => 'SALES_DATE',
                                 target_column_name => 'SALES_AMT',
                                 settings_table_name => 'DEMO_TS_SETTINGS');
END;

When we re-query the DM$VPDEMO_TS_MODEL we get the new values. When plotted we get. Screenshot 2019-04-16 16.17.30
The blue line contains the original data values and the red line contains the predicted values.

Comparing this chart to the chart from the first example we can see there are some important differences between them. These differences are particularly evident in the second half of the chart, on the right hand side. We get to see there is a clearer dip in the predicted data. This mirrors the real data values better. We also see better predictions as the time line moves to the end.

When performing time-series analysis you really need to spend some time exploring the data, to understand what is happening, visualizing the data, seeing if you can identifying any patterns, before moving onto using the different models. Similarly you will need to explore the various time-series models available and the parameters, to see what works for your data and follow the patterns in your data. There is not magic solution in this case.

Wednesday, March 7, 2018

Oracle 18c New Oracle Advanced Analytics (Machine Learning) features

With each release of the Oracle Database we get new Machine Learning features, under the umbrella term of Oracle Advanced Analytics option (OAA).

With Oracle 18c we get the following new features, that include new machine learning algorithms, improvements to machine learning algorithms, and meta-data improvements for registering new R based algorithms.

These new OAA features include:

New Time-Series function : This new function forecasts target value based solely on a known history of target values and uses the popular auto-regressive modelling method.

New Model Detail Views : Previously you could inspect the details of a model using a function. This is being phased out and replaced by model view, with the format DM$VA

New Neural Networks Algorithm : With the growing interest in deep learning, Oracle have now included a neural network algorithm into the database, thus providing SQL and PL/SQL interfaces to all for easy of use and easy of integration into applications.

New Random Forest Algorithm : Random Forests has been proven over the past few years to be very accurate for certain types of classification problems. This algorithm has now been included in the database, with SQL and PL/SQL interfaces.

Improved Sampling for Association Rules : A new specialised sampling approach is introduced for Association Rules. This is to improve performance, while maintaining accuracy, for large/big data sets.

Algorithm Meta Data Registration : Simplifies the integration of new algorithms in the R extensibility framework. This feature allows a uniform consistent approach of registering new algorithm functions and their settings.

New Exponential Smoothing Algorithm : This allows for users to make predictions from time series data, and includes 14 models, including the popular Holt (trend) and Holt-Winters (trend and seasonality) models, and the ability to handle irregular time series intervals.

New CUR Decomposition-based Algorithm for Attribute and Row Importance : Most algorithms focus on identifying columns or rows that are important within their data sets. This algorithm has the added feature of also identifying important rows.


As you can see there are a lot of machine learning new features in Oracle 18c. Each one of these new features will be explored in more detail in separate blog posts.

Monday, August 28, 2017

How to speed up your Oracle Data Mining with in-memory and parallel

Have you have found running a workflow in Oracle Data Miner slow or running the scripts in the database slow ?

No. Good, because I haven't found it slow.

But (there is always a but) it really depends on the volume of data your are dealing with. For the vast majority of us who aren't of the size of google, amazon, etc have data volumes that are not that large really and a basic server can process many millions of records extremely quickly using Oracle Data Mining.

But what if we have a large volume of data. In one recent project I had a data set containing over 3.5 billion records. Now that is big data. All of this data sitting in an Oracle Database.

So how can we process over 3.5 billion records in a couple of seconds, building 4 machine learning models in that time? Is that really possible with just using an Oracle Database? Yes is the answer and very easily. (Surely I needed Hadoop and Spark to process this data? Nope!)

The Oracle Data Miner (ODMr) tool comes with a new feature in SQL Developer 4 (and higer) that allows you to manage using Parallel execution and the in-memory DB features. These can be accessed on the ODMr Worksheet tool bar.

NewImage

The best time to look at these setting is when you have created your workflow and are ready to run it for the first time. When you click on the 'Performance Options' link, you will get the following window. It will display the list of nodes you have in the workflow and will then indicate if the Degree of Parallel and the In-Memory options can be set for each of the nodes.

NewImage

The default values are shown and you can changes these. For example, in a lot of scenarios you might prefer to leave the Degree of Parallel as System Determined. This will then use whatever the the default is for the database and controlled by the DBA, but if you want to specify a particular value then you can, for example setting the degree of parallel to 4 for the 'Class Build' node, in the above image. Similarly for the in-memory option, this will only be available for nodes where the in-memory option would be applicable. This will be where there is a lot of data processing (preparing data, transforming data, performing specific statistics, etc) and for storing any data that is generated by Oracle Data Mining.

But what if you want to change the default values. You can change these at a global level within the SQL Developer Preferences. Here you can set the default to be used for each of the different types of Oracle Data Mining nodes.

NewImage

I mentioned at the start that I've been able to build 4 machine learning models using Oracle Data Mining on a data set of over 3.5 billion records, all in a couple of seconds. In my scenario Parallel was set to 16 and we didn't use in-memory as we didn't have the licence for it. You can see that machine learning at lighting speed (ish) is possible. This timing is only for building the models, which is the step that consumes the most about of resources and time. When it comes to scoring the data, that is lighting fast. In may scenario, scoring over 300,000 was less than a second, and I didn't use parallel or anything else to speed things up. Because we didn't need to.

Go give it a try!

Monday, August 21, 2017

Scheduling ODMr Workflows in SQL Developer 4.2+

A new feature for Oracle Data Mining (ODM) (part of SQL Developer 4.2) is the ability to schedule an ODM workflow to run a defined time or frequency. This blog post will bring you through the steps need to schedule an ODM workflow using this new feature. The first thing that you need is an ODMr workflow. The following image is a familiar looking one that I typically use to get a very quick demo of how easy it is to build a machine learning workflow. NewImage Just above the workflow worksheet we have a row of icon buttons. In the above image one of these is highlighted by a red box. This is the workflow scheduler. So go ahead on click on it. NewImage In most cases you will want to run the entire workflow. The default option presented to is 'All Nodes'. If you would only like a subset of the nodes to run, you can click-on or select the node in the workflow and then click on the scheduler icon. In our example we are going to run the entire workflow, so select 'All Nodes' from the menu. NewImage The main scheduler window will open. Here you can set the Start Date and time of the first run, what the Repeat frequency is (none, every day, every week or custom) and to End the Repeat (Never, After, On Date). To schedule a once off run of the workflow just set the Date and Time, set the Repeat to 'None' and End Repeat should disappear in this instance. If Repeat was set to another value then you can set a value for End Repeat. Go ahead and run the scheduler by clicking on the OK button. NewImage A Scheduled Jobs window should open that will display the details of the scheduled job. When this job is run in the database, this will be shown in the Workflow Jobs window. Here you can see and monitor the progress of the of the workflow. NewImage and that's it. Nice an simple. But there is a something you needed to be WARNED about. When you schedule a workflow, Oracle Data Miner will lock the workflow. This is to ensure that no changes can be made to the scheduled workflow. This is indicated with the Locked button appearing on the icon menu. If you click on this button to unlock the workflow, it will also cancel your scheduled jobs associated with this workflow. NewImage Also when the scheduled workflow is finished, the workflow will remain locked. So you will have to click on this Locked button to unlock the workflow. There are a few additional advanced features. These can be found by clicking on the 'Advanced...' button in the main scheduler window. The first table displayed allows you to specify if you want an email sent for the different stages of the scheduled job. The second tab allows you to set the Job Priority, Max Failures, Max Run Duration and Schedule Limits. NewImage

Tuesday, April 18, 2017

ODM Model View Details Views in Oracle 12.2

A new feature for Oracle Data Mining in Oracle 12.2 is the new Model Details views.

In Oracle 11.2.0.3 and up to Oracle 12.1 you needed to use a range of PL/SQL functions (in DBMS_DATA_MINING package) to inspect the details of a data mining/machine learning model using SQL.

Check out these previous blog posts for some examples of how to use and extract model details in Oracle 12.1 and earlier versions of the database

Association Rules in ODM-Part 3

Extracting the rules from an ODM Decision Tree model

Cluster Details

Viewing Decision Tree Details

Instead of these functions there are now a lot of DB views available to inspect the details of a model. The following table summarises these various DB Views. Check out the DB views I've listed after the table, as these views might some some of the ones you might end up using most often.

I've now chance of remembering all of these and this table is a quick reference for me to find the DB views I need to use. The naming method used is very confusing but I'm sure in time I'll get the hang of them.

NOTE: For the DB Views I've listed in the following table, you will need to append the name of the ODM model to the view prefix that is listed in the table.

Data Mining Type Algorithm & Model Details 12.2 DB View Description
Association Association Rules DM$VR generated rules for Association Rules
Frequent Itemsets DM$VI describes the frequent itemsets
Transaction Itemsets DM$VT describes the transactional itemsets view
Transactional Rules DM$VA describes the transactional rule view and transactional itemsets
Classification (General views for Classification models) DM$VT

DM$VC

describes the target distribution for Classification models

describes the scoring cost matrix for Classification models

Decision Tree DM$VP

DM$VI

DM$VO

DM$VM

describes the DT hierarchy & the split info for each level in DT

describes the statistics associated with individual tree nodes

Higher level node description

describes the cost matrix used by the Decision Tree build

Generalized Linear Model DM$VD

DM$VA

describes model info for Linear Regres & Logistic Regres

describes row level info for Linear Regres & Logistic Regres

Naive Bayes DM$VP

DM$VV

describes the priors of the targets for Naïve Bayes

describes the conditional probabilities of Naïve Bayes model

Support Vector Machine DM$VL describes the coefficients of a linear SVM algorithm
Regression ??? Doe 80 50
Clustering (General views for Clustering models) DM$VD

DM$VA

DM$VH

DM$VR

Cluster model description

Cluster attribute statistics

Cluster historgram statistics

Cluster Rule statistics

k-Means DM$VD

DM$VA

DM$VH

DM$VR

k-Means model description

k-Means attribute statistics

k-Means historgram statistics

k-Means Rule statistics

O-Cluster DM$VD

DM$VA

DM$VH

DM$VR

O-Cluster model description

O-Cluster attribute statistics

O-Cluster historgram statistics

O-Cluster Rule statistics

Expectation Minimization DM$VO

DM$VB

DM$VI

DM$VF

DM$VM

DM$VP


describes the EM components

the pairwise Kullback–Leibler divergence

attribute ranking similar to that of Attribute Importance

parameters of multi-valued Bernoulli distributions

mean & variance parameters for attributes by Gaussian distribution

the coefficients used by random projections to map nested columns to a lower dimensional space

Feature Extraction Non-negative Matrix Factorization DM$VE

DM$VI

Encoding (H) of a NNMF model

H inverse matrix for NNMF model

Singular Value Decomposition DM$VE

DM$VV

DM$VU

Associated PCA information for both classes of models

describes the right-singular vectors of SVD model

describes the left-singular vectors of a SVD model

Explicit Semantic Analysis DM$VA

DM$VF

ESA attribute statistics

ESA model features

Feature Section Minimum Description Length DM$VA describes the Attribute Importance as well as the Attribute Importance rank

Normalizing and Error Handling views created by ODM Automatic Data Processing (ADP)

  • DM$VN : Normalization and Missing Value Handling
  • DM$VB : Binning

Global Model Views

  • DM$VG : Model global statistics
  • DM$VS : Computed model settings
  • DM$VW :Alerts issued during model creation

Each one of these new DB views needs their own blog post to explain what informations is being explained in each. I'm sure over time I will get round to most of these.

Monday, April 3, 2017

Managing memory allocation for Oracle R Enterprise Embedded Execution

When working with Oracle R Enterprise and particularly when you are using the ORE functions that can spawn multiple R processes, on the DB Server, you need to be very aware of the amount of memory that will be consumed for each call of the ORE function.

ORE has two sets of parallel functions for running your user defined R scripts stored in the database, as part of the Embedded R Execution feature of ORE. The R functions are called ore.groupApply, ore.rowApply and ore.indexApply. When using SQL there are "rqGroupApply" and rqRowApply. (There is no SQL function equivalent of the R function ore.indexApply)

For each parallel R process that is spawned on the DB server a certain amount of memory (RAM) will be allocated to this R process. The default size of memory to be allocated can be found by using the following query.

select name, value from sys.rq_config;

NAME                                VALUE
----------------------------------- -----------------------------------
VERSION                             1.5
MIN_VSIZE                           32M
MAX_VSIZE                           4G
MIN_NSIZE                           2M
MAX_NSIZE                           20M

The memory allocation is broken out into the amount of memory allocated for Cells and NCells for each R process.

If your parallel ORE function create a large number of parallel R processes then you can see that the amount of overall memory consumed can be significant. I've seen a few customers who very quickly run out of memory on their DB servers. Now that is something you do not want to happen.

How can you prevent this from happening ?

There are a few things you need to keep in mind when using the parallel enabled ORE functions. The first one is, how many R processes will be spawned. For most cases this can be estimated or calculated to a high degree of accuracy. Secondly, how much memory will be used to process each of the R processes. Thirdly, how memory do you have available on the DB server. Fourthly, how many other people will be running parallel R processes at the same time?

Examining and answering each of these may look to be a relatively trivial task, but the complexity behind these can increase dramatically depending on the answer to the fourth point/question above.

To calculate the amount of memory used during the ORE user defined R script, you can use the R garbage function to calculate the memory usage at the start and at the end of the R script, and then return the calculated amount. Yes you need to add this extra code to your R script and then remove it when you have calculated the memory usage.

gc.start <- gc(reset=TRUE)
...
gc.end <- gc()
gc.used <- gc.end[,7] - gc.start[,7] # amount consumed by the processing

Using this information and the answers to the points/questions I listed above you can now look at calculating how much memory you need to allocated to the R processes. You can set this to be static for all R processes or you can use some code to allocate the amount of memory that is needed for each R process. But this starts to become messy. The following gives some examples (using R) of changing the R memory allocations in the Oracle Database. Similar commands can be issued using SQL.

> sys.rqconfigset('MIN_VSIZE', '10M') -- min heap 10MB, default 32MB
> sys.rqconfigset('MAX_VSIZE', '100M') -- max heap 100MB, default 4GB
> sys.rqconfigset('MIN_NSIZE', '500K') -- min number cons cells 500x1024, default 1M
> sys.rqconfigset('MAX_NSIZE', '2M') -- max number cons cells 2M, default 20M

Some guidelines - as with all guidelines you have to consider all the other requirements for the Database, and in reality you will have to try to find a balance between what is listed here and what is actually possible.

  • Set parallel_degree_policy to MANUAL.
  • Set parallel_min_servers to the number of parallel slave processes to be started when the database instances start, this avoids start up time for the R processes. This is not a problem for long running processes. But can save time with processes running for 10s seconds
  • To avoid overloading the CPUs if the parallel_max_servers limit is reached, set the hidden parameter _parallel_statement_queuing to TRUE. Avoids overloading and lets processes wait.
  • Set application tables and their indexes to DOP 1 to reinforce the ability of ORE to determine when to use parallelism.

Understanding the memory requirements for your ORE processes can be tricky business and can take some time to work out the right balance between what is needed by the spawned parallel R processes and everything else that is going on in the Database. There will be a lot of trial and error in working this out and it is always good to reach out for some help. If you have a similar scenario and need some help or guidance let me know.

Wednesday, March 29, 2017

OUG Ireland 2017 Presentation

Here are the slides from my presentation at OUG Ireland 2017. All about running R using SQL.

Friday, March 3, 2017

Blog posts on Oracle Advanced Analytics features in 12.2

A couple of days ago Oracle finally provided us with an on-premises download for Oracle 12.2 Database.

Go and download load it from here

or

Download the Database App Development VM with 12.2 (This is what I did)

Over the past couple of months I've been using the DBaaS of 12.2, trying out some of the new Advanced Analytics option new features, and other new features. Here are the links to the blog posts on these new 12.2 new features. There will be more coming over the next few months.

New OAA features in Oracle 12.2 Database

Explicit Semantic Analysis in Oracle 12.2c Database

Explicit Semantic Analysis setup using SQL and PL/SQL

and slightly related is the new SQL Developer 4.2

Oracle Data Miner 4.2 New Features

Thursday, January 26, 2017

Formatting results from ORE script in a SELECT statement

This blog post looks at how to format the output or the returned returns from an Oracle R Enterprise (ORE), user defined R function, that is run using a SELECT statement in SQL.

Sometimes this can be a bit of a challenge to work out, but it can be relatively easy once you have figured out how to do it. The following examples works through some scenarios of different results sets from a user defined R function that is stored in the Oracle Database.

To run that user defined R function using a SELECT statement I can use one of the following ORE SQL functions.

  • rqEval
  • rqTableEval
  • "rqGroupEval"
  • rqRowEval

For simplicity we will just use the first of these ORE SQL functions to illustrate the problem and how to go about solving it. The rqEval ORE SQL function is a generate purpose function to call a user defined R script stored in the database. The function does not require any input data set and but it will return some data. You could use this to generate some dummy/test data or to find some information in the database. Here is noddy example that returns my name.

BEGIN
   --sys.rqScriptDrop('GET_NAME');
   sys.rqScriptCreate('GET_NAME',
      'function() {
         res<-data.frame("Brendan")
         res
         } ');
END;

To call this user defined R function I can use the following SQL.

select *
from table(rqEval(null,
                  'select cast(''a'' as varchar2(50))  from dual',
                  'GET_NAME') );  

For text strings returned you need to cast the returned value giving a size.

If we have a numeric value being returned we can don't have to use the cast and instead use '1' as shown in the following example. This second example extends our user defined R function to return my name and a number.

BEGIN
   sys.rqScriptDrop('GET_NAME');
   sys.rqScriptCreate('GET_NAME',
      'function() {
         res<-data.frame(NAME="Brendan", YEAR=2017)
         res
         } ');
END;

To call the updated GET_NAME function we now have to process two returned columns. The first is the character string and the second is a numeric.

select *
from table(rqEval(null,
                  'select cast(''a'' as varchar2(50)) as "NAME", 1 AS YEAR  from dual',
                  'GET_NAME') );                  

These example illustrate how you can process character strings and numerics being returned by the user defined R script.

The key to setting up the format of the returned values is knowing the structure of the data frame being returned by the user defined R script. Once you know that the rest is (in theory) easy.

Monday, January 23, 2017

Oracle Data Miner 4.2 New Features

Oracle Data Miner 4.2 (part of SQL Developer 4.2) got released as an Early Adopter versions (EA) a few weeks ago.

I had an earlier blog post that looked that the new Oracle Advanced Analytics in-database new features with the Oracle 12.2 Database.

With the new/updated Oracle Data Miner (ODMr) there are a number of new features. These can be categories as 1) features all ODMr users can use now, 2) New features that are only usable when using Oracle 12.2 Database, and 3) Updates to existing algorithms that have been exposed via the ODMr tool.

The following is a round up of the main new features you can enjoy as part of ODMr 4.2 (mainly covering points 1 and 2 above)

  • You can now schedule workflows to run based on a defined schedule
  • Support for additional data types (RAW, ROWID, UROWID, URITYPE)
  • Better support for processing JSON data in the JSON Query node
  • Additional insights are displayed as part of the Model Details View
  • Additional alert monitoring and reporting
  • Better support for processing in-memory data
  • A new R Model node that allows you to include in-database ORE user defined R function to support model build, model testing and applying of new model.
  • New Explicit Semantic Analysis node (Explicit Feature Extraction)
  • New Feature Compare and Test nodes
  • New workflow status profiling perfoance improvements
  • Refresh the input data definition in nodes
  • Attribute Filter node now allows for unsupervised attribute importance ranking
  • The ability to build Partitioned data mining models

Look out for the blog posts on most of these new features over the coming months.

WARNING: Most of these new features requires an Oracle 12.2 Database.

NewImage

Monday, January 16, 2017

Explicit Semantic Analysis setup using SQL and PL/SQL

In my previous blog post I introduced the new Explicit Semantic Analysis (ESA) algorithm and gave an example of how you can build an ESA model and use it. Check out this link for that blog post.

In this blog post I will show you how you can manually create an ESA model. The reason that I'm showing you this way is that the workflow (in ODMr and it's scheduler) may not be for everyone. You may want to automate the creation or recreation of the ESA model from time to time based on certain business requirements.

In my previous blog post I showed how you can setup a training data set. This comes with ODMr 4.2 but you may need to expand this data set or to use an alternative data set that is more in keeping with your domain.

Setup the ODM Settings table

As with all ODM algorithms we need to create a settings table. This settings table allows us to store the various parameters and their values, that will be used by the algorithm.

-- Create the settings table
CREATE TABLE ESA_settings (
    setting_name VARCHAR2(30),
    setting_value VARCHAR2(30));

-- Populate the settings table
-- Specify ESA. By default, Naive Bayes is used for classification.
-- Specify ADP. By default, ADP is not used. Need to turn this on.
BEGIN
    INSERT INTO ESA_settings (setting_name, setting_value)
    VALUES (dbms_data_mining.algo_name,       
           dbms_data_mining.algo_explicit_semantic_analys);
   
    INSERT INTO ESA_settings (setting_name, setting_value)
    VALUES (dbms_data_mining.prep_auto,dbms_data_mining.prep_auto_on);
  
    INSERT INTO ESA_settings (setting_name, setting_value)
    VALUES (odms_sampling,odms_sampling_disable);
  
    commit;
END; 

These are the minimum number of parameter setting needed to run the ESA algorithm. The other ESA algorithm setting include:

NewImage

Setup the Oracle Text Policy

You also need to setup an Oracle Text Policy and a lexer for the Stopwords.

DECLARE
   v_policy_name  varchar2(30);
   v_lexer_name   varchar2(3)
BEGIN
    v_policy_name  := 'ESA_TEXT_POLICY';
    v_lexer_name   := 'ESA_LEXER';
    ctx_ddl.create_preference(v_lexer_name, 'BASIC_LEXER');
    v_stoplist_name := 'CTXSYS.DEFAULT_STOPLIST';  -- default stop list
    ctx_ddl.create_policy(policy_name => v_policy_name, lexer => v_lexer_name, stoplist => v_stoplist_name);
END;

Create the ESA model

Once we have the settings table created with the parameter values set for the algorithm and the Oracle Text policy created, we can now create the model.

To ensure that the Oracle Text Policy is applied to the text we want to analyse we need to create a transformation list and add the Text Policy to it.

We can then pass the text transformation list as a parameter to the CREATE_MODEL, procedure.

DECLARE
   v_xlst              dbms_data_mining_transform.TRANSFORM_LIST;
   v_policy_name       VARCHAR2(130) := 'ESA_TEXT_POLICY';
   v_model_name        varchar2(50) := 'ESA_MODEL_DEMO_2';
BEGIN
   v_xlst := dbms_data_mining_transform.TRANSFORM_LIST();
   DBMS_DATA_MINING_TRANSFORM.SET_TRANSFORM(v_xlst, '"TEXT"', NULL, '"TEXT"', '"TEXT"', 'TEXT(POLICY_NAME:'||v_policy_name||')(MAX_FEATURES:3000)(MIN_DOCUMENTS:1)(TOKEN_TYPE:NORMAL)');

    DBMS_DATA_MINING.DROP_MODEL(v_model_name, TRUE);
    DBMS_DATA_MINING.CREATE_MODEL(
        model_name          => v_model_name,
        mining_function     => DBMS_DATA_MINING.FEATURE_EXTRACTION,
        data_table_name     => 'WIKISAMPLE',
        case_id_column_name => 'TITLE',
        target_column_name  => NULL,
        settings_table_name => 'ESA_SETTINGS',
        xform_list          => v_xlst);
END;

NOTE: Yes we could have merged all of the above code into one PL/SQL block.

Use the ESA model

We can now use the FEATURE_COMPARE function to use the model we just created, just like I did in my previous blog post.
SELECT FEATURE_COMPARE(ESA_MODEL_DEMO_2
               USING 'Oracle Database is the best available for managing your data' text 
               AND USING 'The SQL language is the one language that all databases have in common' text) similarity 
FROM DUAL;

Go give the ESA algorithm a go and see where you could apply it within your applications.

Wednesday, January 4, 2017

Explicit Semantic Analysis in Oracle 12.2c Database

A new Oracle Data Mining algorithm in the Oracle 12.2c Database is called Explicit Semantic Analysis.

[The following examples are built using Oracle Data Miner 4.2 (SQL Developer 4.2) and the Oracle 12.2 Database cloud service (extreme edition) ]

The Explicit Semantic Analysis algorithm is an unsupervised algorithm used for feature extraction. ESA does not discover latent features but instead uses explicit features based on an existing knowledge base. There is no setup or install necessary to use this algorithm All you need is a licence for the Advanced Analytics Option for the database. The out from the algorithm is a distance measure that indicates how similar or dis-similar the input texts are, using the ESA model (and the training data set used). Let us look at an example. Setup training data for ESA Algorithm

Oracle Data Miner 4.2 (that comes with SQL Developer 4.2) has a data Wiki data set from 2005. This contains over 200,000 features. To locate the file go to.

...\sqldeveloper\dataminer\scripts\instWikiSampleData.sql

This file contains the DDL and the insert statements for the Wiki data set.

NewImage

After you run this script a new table called WIKISAMPLE table exists and contains records

NewImage

This gives us the base/seed data set to feed into the ESA algorithm.

Create the ESA Model using ODMr

To create the ESA model we have 2 ways of doing this. In this blog post I'll show you the easiest way by using the Oracle Data Miner (ODMr) tool. I'll have another blog post that will show you the SQL needed to create the model.

In an ODMr workflow create a new Data Source node. Then set this node to have the WIKISAMPLE table as it's data source.

Next you need to create the ESA node on the workflow. This node can be found in the Models section, of the Workflow Editor. The node is called Explicit Feature Extraction. Click on this node, in the model section, and then move your mouse to your workflow and click again. The ESA node will be created.

Join the Data Node to the ESA node by right clicking on the data node and then clicking on the ESA node.

Double click on the ESA node to edit the properties of the node and the algorithm.

NewImage

Explore the ESA Model and ESA Model Features

After the model node has finished you can now explore the results generated by the ESA model. Right click on the model node and select 'View Model'. The model properties window opens and it has 2 main tabs. The first of these is the coefficients tab. Here you can select a particular topic (click on the search icon beside the Feature ID) and select it from the list. The attributes and their coefficient values will be displayed.

NewImage

Next you can examine the second tab that is labeled as Features. In this table we can select a particular record and have a tag cloud and coefficients displayed. The tag cloud is a great way to see visually what words are important.

NewImage

How to use the ESA model to Compare new data using SQL

Now that we have the ESA model created, we can not use it model to compare other similar sets of documents.

You will need to use the FEATURE_COMPARE SQL function to evaluate the input texts, using the ESA model to compare for similarity. For example,

SELECT FEATURE_COMPARE(feat_esa_1_1
          USING 'Oracle Database is the best available for managing your data' text 
          AND USING 'The SQL language is the one language that all databases have in common' text) similarity 
FROM DUAL;
NewImage

The result we get is 0.7629.

The result generate by the query is a distance measure. The FEATURE_COMPARE function returns a comparison number in the range 0 to 1. Where 0 indicates that the text are not similar or related. If a 1 is returned then that indicated that the text are very similar or very related.

You can use this returned value to make a decision on what happens next. For example, it can be used to decide what the next step should be in your workflow and you can easily write application logic to manage this.

The examples given here are for general text. In the real world you would probably need a bigger data set. But if you were to use this approach in other domains, such as legal, banking, insurance, etc. then you would need to create a training data set based on the typical language that is used in each of those domains. This will then allow you to compare documents with each domain with greater accuracy.

[The above examples are built using Oracle Data Miner 4.2 (SQL Developer 4.2) and the Oracle 12.2 Database cloud service (extreme edition) ]

Monday, December 19, 2016

Auditing Oracle Data Mining model usage

In a previous blog post I talked about how you can rename and comment your Oracle Data Mining models. This is to allow you to easily to see and understand the intended use of the data mining model.

Another feature available to you is to audit the usage of the the data mining models. As your data mining environment grows to many 10s or more typically 100s of models, you will need to have some way of tracking their usage. This can allow you to discover what models are frequently being used and those that are not being used in-frequently. You can then use this information to investigate if there are any issues. Or in some companies I've seen an internal charging scheme in place for each time the models are used.

The following outlines the steps required to setup the auditing of your models and how to inspect the usage.

Note: You will need to the AUDIT_ADMIN role to audit the models.

First create an audit policy for the data mining model in a particular schema.

CREATE AUDIT POLICY oaa_odm_audit_usage 
ACTIONS ALL 
ON MINING MODEL dmuser.high_value_churn_clas_svm;

This creates a policy that monitors all activity on the data mining model HIGH_VALUE_CHURN_CLAS_SVM in the DMUSER schema.

Now we need to enable the policy and allow to to tract all activity on the model.

AUDIT POLICY oaa_odm_audit_usage BY oaa_model_user;

This will track all usage of the data mining model by the schema call OAA_MODEL_USER. We can then use the following query to search for the audit records for the OAA_MODEL_USER schema.

SELECT dbusername,
       action_name, 
       systemm_privilege_used, 
       return_code,
       object_schema, 
       object_name, 
       sql_text
FROM  unified_audit_trail
WHERE object_name = 'HIGH_VALUE_CHURN_CLAS_SVM';

But there is a little problem with using what I've just shown you above. The problem is that it will track all activity on the data mining model. Perhaps this isn't what we really want. Perhaps we only want to track only certain activity of the data mining model. Instead of creating the policy using 'ACTIONS ALL', we can list out the actions or operations we want to track. For example, we want to tract when it is used in a SELECT. The following shows how you can set this up for just SELECT.

CREATE AUDIT POLICY oaa_odm_audit_select 
ACTIONS SELECT 
ON MINING MODEL dmuser.high_value_churn_clas_svm;

AUDIT POLICY oaa_odm_audit_select BY oaa_model_user;

The list of individual audit events you can use include:

  • AUDIT
  • COMMENT
  • GRANT
  • RENAME
  • SELECT

A policy can be setup to tract one or more of these events. For example, if we wanted a policy to track SELECT and GRANT, we would have list each event separated by a comma.

CREATE AUDIT POLICY oaa_odm_audit_select_grant 
ACTIONS SELECT 
ON MINING MODEL dmuser.high_value_churn_clas_svm,
ACTIONS GRANT 
ON MINING MODEL dmuser.high_value_churn_clas_svm,
;

AUDIT POLICY oaa_odm_audit_select_grant BY oaa_model_user;

Monday, December 12, 2016

Renaming & Commenting Oracle Data Mining Models

As your company evolves with their data mining projects, the number of models produced and in use in production will increase dramatically.

Care needs to be taken when it comes to managing these. This includes using meaningful names, adding descriptions of what the model is about or for, and being able to track their usage, etc.

I will look at tracking the usage of the models in another blog post, but the following gives examples of how to rename Oracle Data Mining models and how to add comments or descriptions to these models. This is particularly useful because our data analytics teams have a constant turn over or it has been many months since you last worked on a model and you want a quick idea of what purpose of the model was for.

If you have been using the Oracle Data Mining tool (part of SQL Developer) will will see your model being created with some sort of sequencing numbers. For example for a Support Vector Machine (SVM) model you might see it labelled for classification:

CLAS_SVM_5_22

While you are working on this project you will know and understand what it was about and why it is being used. But afterward you may forget as you will be dealing with many hundreds of models. Yes you could check your documentation for the purpose of this model but that can take some time.

What if you could run a SQL query to find out?

But first we need to rename the model.

DBMS_DATA_MINING.RENAME_MODEL('CLAS_SVM_5_22', 'HIGH_VALUE_CHURN_CLAS_SVM');

Next we will want to add a longer description of what the model is about. We can do this by adding a comment to the model.

COMMENT ON MINING MODEL high_value_churn_clas_svm IS
'Classification Model to Predict High Value Customers most likely to Churn';

We can now see these updated details when we query the Oracle Data Mining models in a user schema.

SELECT model_name, mining_function, algorithm, comments 
FROM user_mining_models;

These are two very useful commands.

Monday, November 14, 2016

Using the Identity column for Oracle Data Miner

If you are a user of the Oracle Data Miner tool (the workflow data mining tool that is part of SQL Developer), then you will have noticed that for many of the algorithms you can specify a Case Id attribute along with, say, the target attribute.

NewImage

The idea is that you have one attribute that is a unique identifier for each case record. This may or may not be the case in your data model and you may have a multiple attribute primary key or case record identifier.

But what is the Case Id field used for in Oracle Data Miner?

Based on the documentation this field does not need to have a value. But it is recommended that you do identify an attribute for the Case Id, as this will allow for reproducible results. What this means is that if we run our workflow today and again in a few days time, on the exact same data, we should get the same results. So the Case Id allows this to happen. But how? Well it looks like the attribute used or specified for the Case Id is used as part of the Hashing algorithm to partition the data into a train and test data set, for classification problems.

So if you don't have a single attribute case identifier in your data set, then you need to create one. There are a few options open to you to do this.

  • Create one: write some code that will generate a unique identifier for each of your case records based on some defined rule.
  • Use a sequence: and update the records to use this sequence.
  • Use ROWID: use the unique row identifier value. You can write some code to populate this value into an attribute. Or create a view on the table containing the case records and add a new attribute that will use the ROWID. But if you move the data, then the next time you use the view then you will be getting different ROWIDs and that in turn will mean we may have different case records going into our test and training data sets. So our workflows will generate different results. Not what we want.
  • Use ROWNUM: This is kind of like using the ROWID. Again we can have a view that will select ROWNUM for each record. Again we may have the same issues but if we have our data ordered in a way that ensures we get the records returned in the same order then this approach is OK to use.
  • Use Identity Column: In Oracle 12c we have a new feature called Identify Column. This kind of acts like a sequence but we can defined an attribute in a table to be an Identity Column, and as records are inserted into the the data (in our scenario our case table) then this column will automatically generate a unique number for our data. Again if we need to repopulate the case table, you will need to drop and recreate the table to get the Identity Column to reset, otherwise the newly inserted records will start with the next number of the Identity Column

Here is an example of using the Identity Column in a case table.

CREATE TABLE case_table (
id_column	NUMBER GENERATED ALWAYS AS IDENTITY,
affinity_card 	NUMBER,
age		NUMBER,
cust_gender	VARCHAR2(5),
country_name	VARCHAR2(20)
...
);

You can now use this Identity Column as the Case Id in your Oracle Data Miner workflows.

NewImage

Wednesday, November 9, 2016

New OAA features in Oracle 12.2 Database

The Oracle 12.2c Database has been released and is currently available as a Cloud Service. The on-site version should be with us soon.

A few weeks ago I listed some of the new features that you will find in the Oracle Data Miner GUI tool (check out that blog post). I'll have another blog post soon that looks a bit closer at how the new OAA features are exposed in this tool.

In this blog post I will list most of the new database related features in Oracle 12.2. There is a lot of new features and a lot of updated features. Over the next few months (yes it will take that long) I'll have blog posts on most of these.

The Oracle Advanced Analytics Option new features include:

  • The first new feature is one that you cannot see. Yes that sound a bit odd. But the underlying architecture of OAA has been rebuilt to allow for the algorithms to scale significantly. This is also future proofing OAA for new features coming in future releases of the database.
  • Explicit Semantic Analysis. This is a new algorithm allows us to perform text similarity comparison. This is a great new addition and and much, much easier now compared to what we may have had to do previously.
  • Using R models using SQL. Although we have been able to do this in the previous version of the database, the framework and supports have been extended to allow for greater and easier usage of user defined R scripts and R models with the in-database environment.
  • Partitioned Models. We can now build partitioned mining models. This is where you can specify an attribute and a separate model will be created based on each value in the attribute.
  • Partitioned scoring. Similarly we can now dynamically score the data based on an partition attribute.
  • Extentions to Association Rules. Over the past few releases of the database, additional insights to the workings and decision making of the algorithms have been included. In 12.2 we now have some additional insights for the Association Rules aglorithm where we can now get to see the calculation of values associated with rules.
  • DBMS_DATA_MINING package extended. This PL/SQL package has been extended to include the functionality for the new features listed above. Additional it can now process R algorithms and models.
  • SQL Function changes: Change to the followi ODM related SQL functions to allow for partitioned models. CLUSTER_DETAILS, CLUSTER_DISTANCE, CLUSTER_ID, CLUSTER_PROBABILITY, CLUSTER_SET, FEATURE_COMPARE, FEATURE_DETAILS, FEATURE_ID, FEATURE_SET, FEATURE_VALUE, ORA_DM_PARTITION_NAME, PREDICTION, PREDICTION_BOUNDS, PREDICTION_COST, PREDICTION_DETAILS, PREDICTION_PROBABILITY, PREDICTION_SET
  • New SQL Hint for ODM models. We have had hints in SQL for many, many versions now, but with 12.2c we now have a hint for partitioned models, called GROUPING hint.
  • New CREATE_MODEL function. With the existing CREATE_MODEL function the input data set for the function needed to be defined in a table or accessed using a view. Basically the data needed to resist somewhere. With CREAETE_MODEL2 you can now define the input data set based on a SELECT statement.

In addition to all of these changes there are also some new interesting DB, SQL and PL/SQL new features that are of particular interest for your data science, machine learning, advanced analytics (or whatever the current favourite marketing term is today) projects.

It is going to be a busy few months ahead, working through all of these new features and write blog posts on how to use each of them.

Tuesday, October 25, 2016

Oracle Text, Oracle R Enterprise and Oracle Data Mining - Part 5

In this 5th blog post in my series on using the capabilities of Oracle Text, Oracle R Enterprise and Oracle Data Mining to process documents and text, I will have a look at some of the machine learning features of Oracle Text.

Oracle Text comes with a number of machine learning algorithms. These can be divided into two types. The first is called 'Supervised Learning' where we have two machine learning algorithms for classification type of problem. The second type is called 'Unsupervised Learning' where we have the ability to use clustering machine learning algorithms to look for patterns in our text documents and to find similarities between documents based on their contents.

It is this second type of document clustering that I will work through in this blog post.

When using clustering with text documents, the machine learning algorithm will look for patterns that are common between the documents. These patterns will include the words used, the frequency of the words, the position or ordering of these words, the co-occurance of words, etc. Yes this is a large an complex task and that is why we need a machine learning algorithm to help us.

With Oracle Text we only have one clustering machine learning algorithm available to use. When we move onto using the Oracle Advanced Analytics Option (Oracle Data Mining and Oracle R Enterprise) we more algorithms available to us.

With Oracle Text the clustering algorithm is called k-Means. In a way the actual algorithm is unimportant as it is the only one available to us when using Oracle Text. To use this algorithm we have the CTX_CLS.CLUSTERING procedure. This procedure takes the documents we want to compare and will then identify the clusters (using hierarchical clustering) and will then tells us, for each document, what clusters the documents belong to and they probability value. With clustering a document (or a record) can belong to many clusters. Typically in the text books we see clusters that are very distinct and are clearly separated from each other. When you work on real data this is never the case. We will have many over lapping clusters and a data point/record can belong to one or more clusters. This is why we need the probability vale. We can use this to determine what cluster our record belongs to most and what other clusters it is associated with.

Using the example documents that I have been using during this series of blog posts we can use the CTX_CLS.CLUSTERING algorithm to cluster and identify similarities in these documents.

We need to setup the parameters that will be used by the CTX_CLS.CLUSTERING procedure. Tell it to use the k-Means algorithm and then the number of clusters to generate. As with all Oracle Text procedures or algorithms there are a number of settings you can configure or you can just accept the default values.

exec ctx_ddl.drop_preference('Cluster_My_Documents');
exec ctx_ddl.create_preference('Cluster_My_Documents','KMEAN_CLUSTERING');
exec ctx_ddl.set_attribute('Cluster_My_Documents','CLUSTER_NUM','3');

The code above is an example of the basics of what you need to setup for clustering. Other attribute or cluster parameter setting available to you include, MAX_DOCTERMS, MAX_FEATURES, THEME_ON, TOKEN_ON, STEM_ON, MEMORY_SIZE and SECTION_WEIGHT.

Now we can run the CTX_CLS.CLUSTERING procedure on our documents. This procedure has the following parameters.

- The Oracle Text Index Name

- Document Id Column Name

- Document Assignment (cluster assignment) Table Name. This table will be created if it doesn't already exist

- Cluster Description Table Name. This table will be created if it doesn't already exist.

- Name of the Oracle Text Preference (list)

exec ctx_cls.clustering(
'MY_DOCUMENTS_OT_IDX',
'DOC_PK',
'OT_CLUSTER_RESULTS',
'DOC_CLUSTER_DETAILS',
'Cluster_My_Documents');

When the procedure has completed we can now examine the OT_CLUSTER_RESULTS and the DOC_CLUSTER_DETAILS tables. The first of these (OT_CLUSTER_RESULTS) allows us to see what documents have been clustered together. The following is what was produced for my documents.

SELECT d.doc_pk, 
       d.doc_title, 
       r.clusterid, 
       r.score 
FROM my_documents d, 
     ot_cluster_results r 
WHERE d.doc_pk = r.docid;

NewImage

We can see that two of the documents have been grouped into the same cluster (ClusterId=2). If you have a look back at what these documents are about then you can see that yes these are very similar. For the other two documents we can see that they have been clustered into separate clusters (ClusterId=4 & 5). The clustering algorithms have said that they are different types of documents. Again when you examine these documents you will see that they are talking about different topics. So the clustering process worked !

You can also explore the various features of the clusters by looking that he DOC_CLUSTER_DETAILS table. Although the details in this table are not overly useful but it will give you some insight into what clusters the k-Means algorithm has produced.

Hopefully I've shown you how easy it is to setup and use the clustering feature of Oracle Text.

WARNING: Before using the Clustering or Classification with Oracle Text, you need to check with your local Oracle Sales representative about if there is licence implication. There seems to be some mentions the the algorithms used are those that come with Oracle Data Mining. Oracle Data Mining is a licence cost option for the database. So make sure you check before you go using these features.

Tuesday, September 6, 2016

Change the size of ORE PNG graphics using in-database R functions

In a previous blog post I showed you how create and display a ggplot2 R graphic using SQL. Make sure to check it out before reading the rest of this blog post.
In my previous blog post, I showed and mentioned that the PNG graphic returned by the embedded R execution SQL statement was not the same as what was produced if you created the graphic in an R session.
Here is the same ggplot2 graphic. The first one is what is produced in an R session and the section is what is produced by SQL query and the embedded R execution in Oracle.
NewImage NewImage
As you can see the second image (produced using the embedded R execution) gives a very square image.
The reason for this is that Oracle R Enterprise (ORE) creates the graphic image in PNG format. The default setting from this is 480 x 480. You will find this information when you go digging in the R documentation and not in the Oracle documentation.
So, how can I get my ORE produced graphic to appear like what is produced in R?
What you need to do is to change the height and width of the PNG image produced by ORE. You can do this by passing parameters in the SQL statement used to call the user defined R function, that in turn produces the ggplot2 image.
In my previous post, I gave the SQL statement to call and produce the graphic (shown above). One of the parameters to the rqTableEval function was set to null. This was because we didn't have any parameters to pass, apart from the data set.
We can replace this null with any parameters we want to pass to the user defined R function (demo_ggpplot). To pass the parameters we need to define them using a SELECT statement.
cursor(select 500 as "ore.png.height", 850 as "ore.png.width" from dual),
The full SELECT statement now becomes
select *
from table(rqTableEval( cursor(select * from claims),
                        cursor(select 500 as "ore.png.height", 850 as "ore.png.width" from dual),
                        'PNG',
                        'demo_ggpplot'));
When you view the graphic in SQL Developer, you will get something that looks a bit more like what you would expect or want to see.
NewImage
For each graphic image you want to produce using ORE you will need to figure out that are the best PNG height and width settings to use. Plus it also depends on what tool or application you are going to use to display the images (eg. APEX etc)

Wednesday, August 24, 2016

How to get ORE to work with APEX

This blog post will bring you through the steps of how to get Oracle R Enterprise (ORE) to work with APEX.

The reason for this blog posts is that since ORE 1.4+ the security model has changed for how you access and run in-database user defined R scripts using the ORE SQL API functions.

I have a series of blog posts going out on using Oracle Text, Oracle R Enterprise and Oracle Data Mining. It was during one of these posts I wanted to show how easy it was to display an R chart using ORE in APEX. Up to now my APEX environment consisted of APEX 4 and ORE 1.3. Everything worked, nice and easy. But in my new APEX environment (APEX 5 and ORE 1.5), it didn't work. This is the calling of an in-database user defined R script using the SQL API functions didn't work. Here is the error message that is displayed.

NewImage

So something extra was needed with using ORE 1.5. The security model around the use of in-database user defined R scripts has changed. Extra functions are now available to allow you who can run these scripts. For example we have an ore.grant function where you can grant another user the privilege to run the script.

But the problem was, when I was in APEX, the application was defined on the same schema that the r script was created in (this was the RQUSER schema). When I connect to the RQUSER schema using ORE and SQL, I was able to see and run this R script (see my previous blog post for these details). But when I was in APEX I wasn't able to see the R script. For example, when using the SQL Workshop in APEX, I just couldn't see the R script.

NewImage

Something strange is going on. It turns out that the view definitions for the in-database ORE scripts are defined with

owner=SYS_CONTEXT('USERENV', 'SESSION_USER');

(Thanks to the Oracle ORE team and the Oracle APEX team for their help in working out what needed to be done)

This means when I'm connected to APEX, using my schema (RQUSER), I'm not able to see any of my ORE objects.

How do you overcome this problem ?

To fix this problem, I needed to grant the APEX_PUBLIC_USER access to my ORE script.

ore.grant(name = "prepare_tm_data_2", type = "rqscript", user = "APEX_PUBLIC_USER")

Now when I query the ALL_RQ_SCRIPTS view again, using the APEX SQL Workshop, I now get the following.

NewImage

Great. Now I can see the ORE script in my schema.

Now when I run my APEX application I now get graphic produced by R, running on my DB server, and delivered to my APEX application using SQL (via a BLOB object), displayed on my screen.

NewImage

Wednesday, August 17, 2016

Oracle Text, Oracle R Enterprise and Oracle Data Mining - Part 3

This is the third blog post of a series on using Oracle Text, Oracle R Enterprise and Oracle Data Mining. Check out the first and second blog posts of the series, as the data used in this blog post was extracted, processed and stored in a databases table.

This blog post is divided into 3 parts. The first part will build on what was covered in in the previous blog post and will expand the in-database ORE R script to include more data processing. The second part of this blog post will look at how you can use SQL to call our in-database ORE R scripts and to be able to include it in our custom applications, for example using APEX (part 3).

Part 1 - Expanding our in-database ORE R script for Text Mining

In my previous blog post we created an ORE user defined R script, that is stored in the database, and this script was used to perform text mining and to create a word cloud. But the data/text to be mined was processed beforehand and passed into this procedure.

But what if we wanted to have a scenario where we just wanted to say, here is the table that contains the data. Go ahead and process it. To do this we need to expand our user defined R script to include the loop to merge the webpage text into one variable. The following is a new version of our ORE user defined R script.

> ore.scriptCreate("prepare_tm_data_2", function (local_data) { 
  library(tm)
  library(SnowballC)
  library(wordcloud)
  
  tm_data <-""
  for(i in 1:nrow(local_data)) {
    tm_data <- paste(tm_data, local_data[i,]$DOC_TEXT, sep=" ")
  }
    
  txt_corpus <- Corpus (VectorSource (tm_data))
  
  # data clean up
  tm_map <- tm_map (txt_corpus, stripWhitespace) # remove white space
  tm_map <- tm_map (tm_map, removePunctuation) # remove punctuations
  tm_map <- tm_map (tm_map, removeNumbers) # to remove numbers
  tm_map <- tm_map (tm_map, removeWords, stopwords("english")) # to remove stop words
  tm_map <- tm_map (tm_map, removeWords, c("work", "use", "java", "new", "support"))

  # prepare matrix of words and frequency counts
  Matrix <- TermDocumentMatrix(tm_map) # terms in rows
  matrix_c <- as.matrix (Matrix)
  freq <- sort (rowSums (matrix_c)) # frequency data
  
  res <- data.frame(words=names(freq), freq)
  wordcloud (res$words, res$freq, max.words=100, min.freq=3, scale=c(7,.5), random.order=FALSE, colors=brewer.pal(8, "Dark2"))
} ) 

To call this R scipts using the embedded R execution we can use the ore.tableApply function. Our parameter to our new R script will now be an ORE data frame. This can be a table in the database or we can create a subset of table and pass it as the parameter. This will mean all the data process will occur on the Oracle Database server. No data is passed to the client or processing performed on the client. All work is done on the database server. The only data that is passed back to the client is the result from the function and that is the word cloud image.

> res <- ore.tableApply(MY_DOCUMENTS, FUN.NAME="prepare_tm_data_2")
> res

Part 2 - Using SQL to perform R Text Mining

Another way you ccan call this ORE user defined R function is using SQL. Yes we can use SQL to call R code and to produce an R graphic. Then doing this the R graphic will be returned as a BLOB. So that makes it easy to view and to include in your applications, just like APEX.

To call our ORE user defined R function, we can use the rqTableEval SQL function. You only really need to set two of the parameters to this function. The first parameter is a SELECT statement the defines the data set to be passed to the function. This is similar to what I showed above using the ore.tableApply R function, except we can have easier control on what records to pass in as the data set. The fourth parameter gives the name of the ORE user defined R script.

select *
from table(rqTableEval( cursor(select * from MY_DOCUMENTS),
                        null,
                        'PNG',
                        'prepare_tm_data_2'));

This is the image that is produced by this SQL statement and viewed in SQL Developer.

NewImage

Part 3 - Adding our R Text Mining to APEX

Adding the SQL to call an ORE user defined script is very simple in APEX. You can create a form or a report based on a query, and this query can be the same query that is given above.

Something that I like to do is to create a view for the ORE SELECT statement. This gives me some flexibility with some potential future modifications. This could be as simple as just changing the name of the script. Also if I discover a new graphic that I want to use, all I need to do is to change the R code in my user defined R script and it will automatically be picked up and displayed in APEX. See the images below.

WARNING: Yes I do have a slight warning. Since the introduction of ORE 1.4 and higher there is a slightly different security model around the use of user defined R scripts. Instead of going into the details of this and what you need to do in this blog post, I will have a separate blog post that describes the behaviour and what you need to do allow APEX to use ORE and to call the user defined R scripts in your schema. So look out for this blog post coming really soon.

NewImage In this blog post I showed you how you use Oracle R Enterprise and the embedded R execution features of ORE to use the text from the webpages and to create a word cloud. This is a useful tool to be able to see visually what words can stand out most on your webpage and if the correct message is being put across to your customers.